Google OAuth Authorized Domain
Google OAuth Authorized Domain
状況
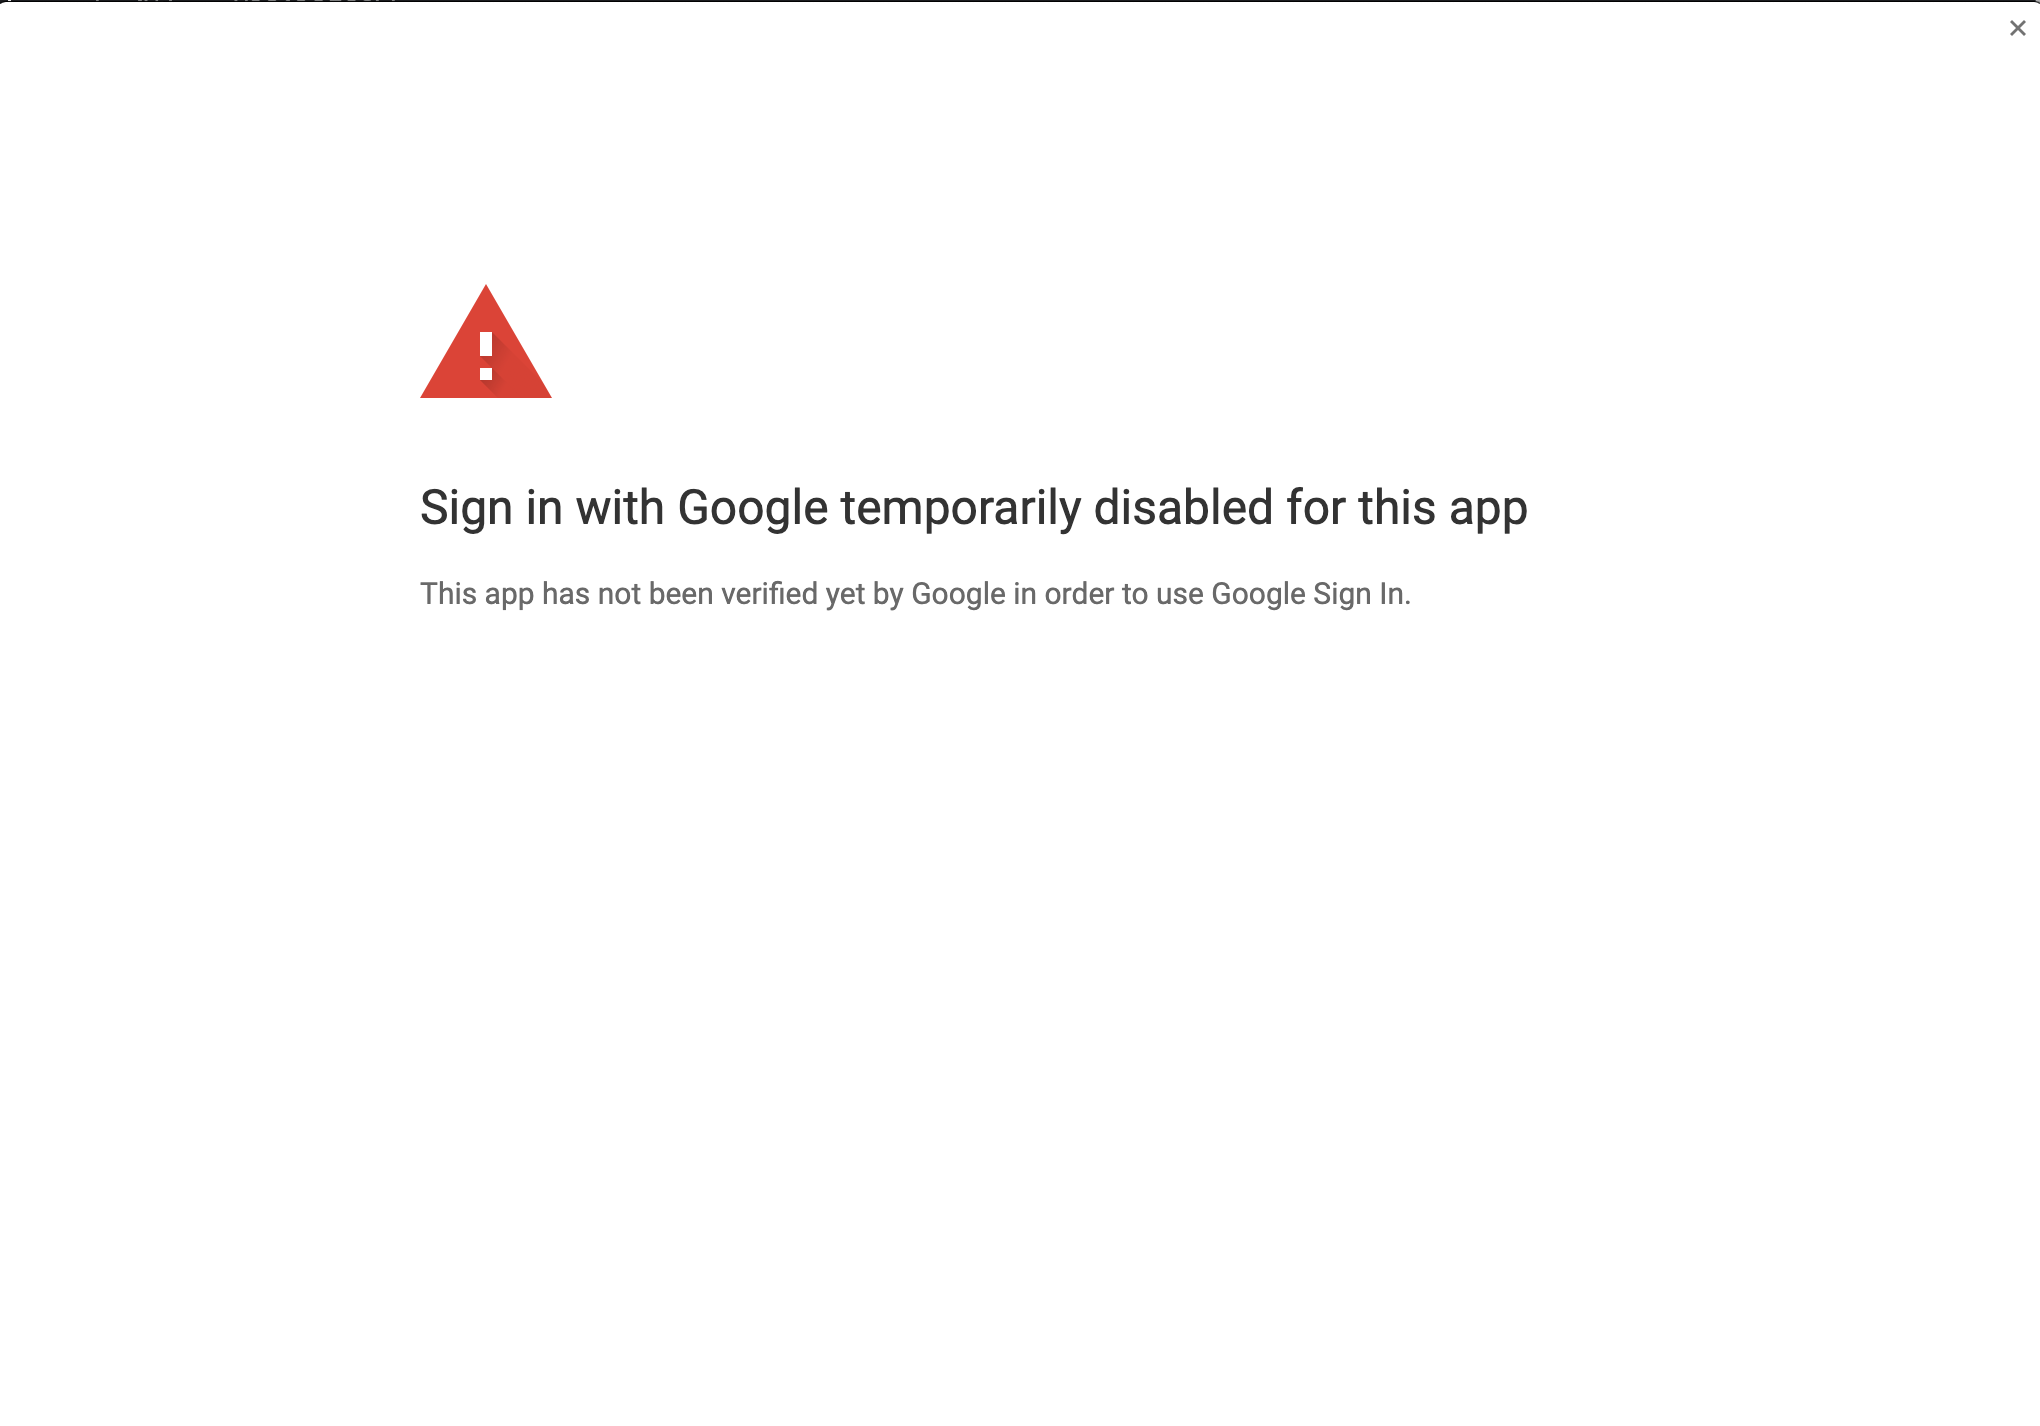
Chrome extension として提供している QuickDrive で認証がうまく行かないとの報告がありました。 (https://github.com/tearoom6/QuickDrive2/issues/16)
試してみると、たしかに Sign in with Google temporarily disabled for this app とのメッセージとともに失敗します。
※ ちょっとこの問題の調査は今年 (2020年) 1月から始めて、めんどくさいことがわかり、しばらく放置していたんですが、その途中でも、 Google APIs 側の画面構成等が変わっているので、貼り付けているスクリーンショット画像が古い場合があります。また、参照リンクがリンク切れを起こしている可能性があります。
原因
Google APIs OAuth consent screen の編集画面を確認すると Application Homepage link" のところで "Invalid domain: URL must be hosted on a domain listed in the "Authorized domains" section. とのエラーが。
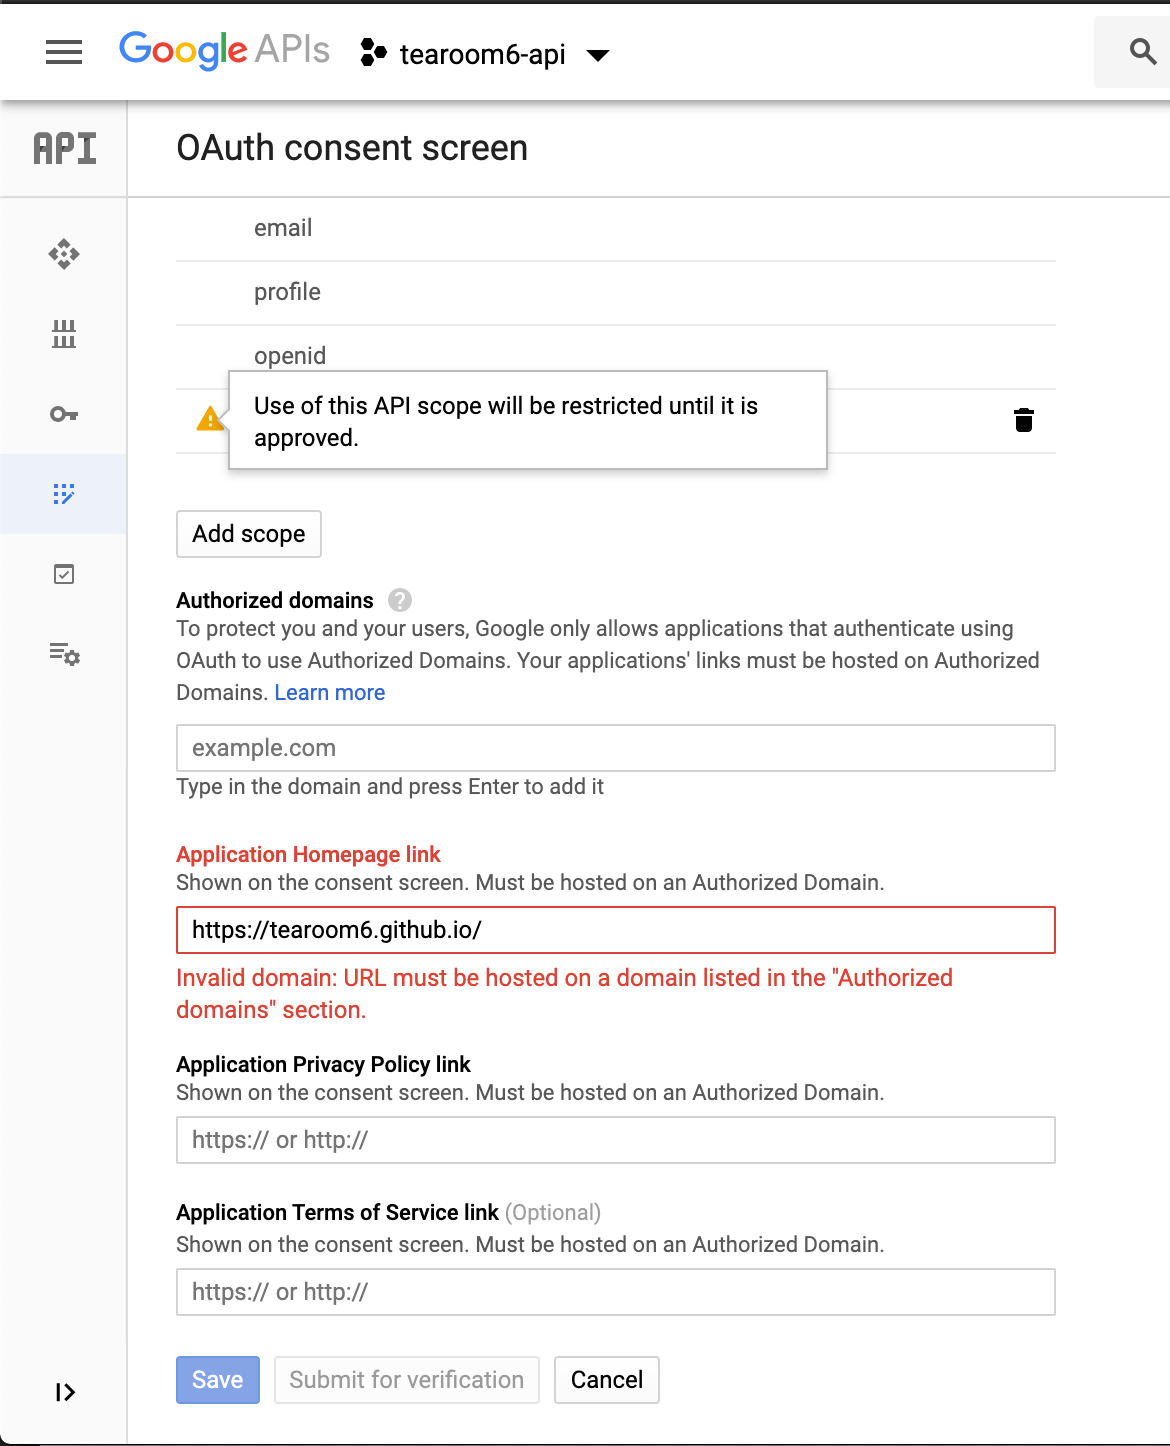
こんなん以前はなかったよな、 (だからこそエラーになってるんだけど) と思ってドキュメントを読んでみると、英語版のドキュメントにはちゃんと書いてありました。 (日本語版には書いてない辺り、後から追加したものなのかなと思ったりする)
要はこの "Application Homepage link" には、今までどこかのホスティングサービス自体のリンクを使用できていたのが、自分が所有権を持つドメインのリンクしか使用できなくなったということらしいです。
対応
カスタムドメインを使うようにして、リンク差し替えてもいいんだけど、それはそれで面倒くさいので、いったんリンク自体を削除してみました。 すると、今度は次のようなエラーが。
Because you've added a sensitive scope, your consent screen requires verification by Google before it's published.
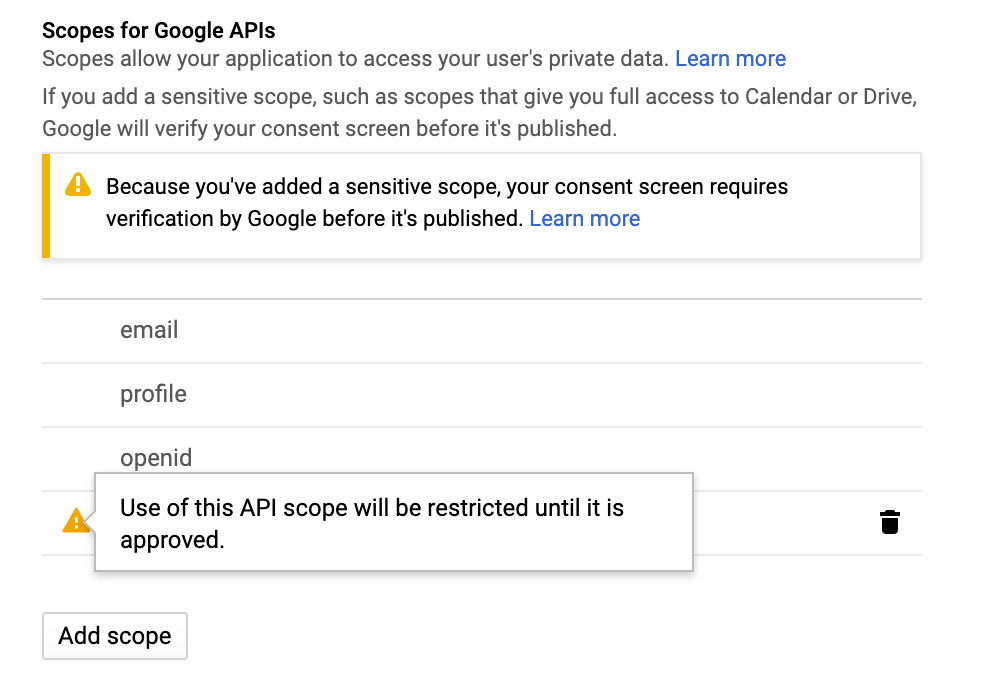
これについては、ページ中にきちんと説明書きが書かれています。
OAuth verification
To protect you and your users, your consent screen and application may need to be verified by Google. Verification is required if your app is marked as Public and at least one of the following is true:
- Your app uses a sensitive and/or restricted scope
- Your app displays an icon on its OAuth consent screen
- Your app has a large number of authorized domains
- You have made changes to a previously-verified OAuth consent screen
The verification process may take up to several weeks, and you will receive email updates as it progresses. Learn more about verification.
Before your consent screen and application are verified by Google, you can still test your application with limitations. Learn more about how your app will behave before it's verified.
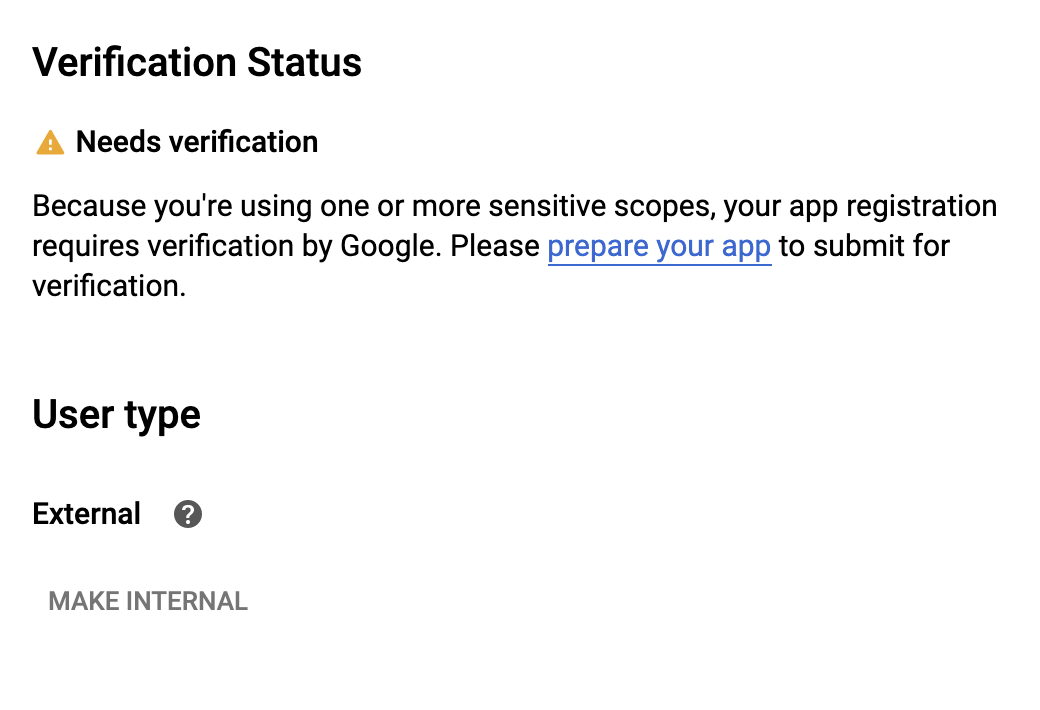
小規模に使う場合や、企業内部だけで使う場合などには verification は不要だけど、 public な service として Google OAuth 2.0 で sensitive な scope を扱いたい場合には verification (Google による審査) が必要ということらしい。
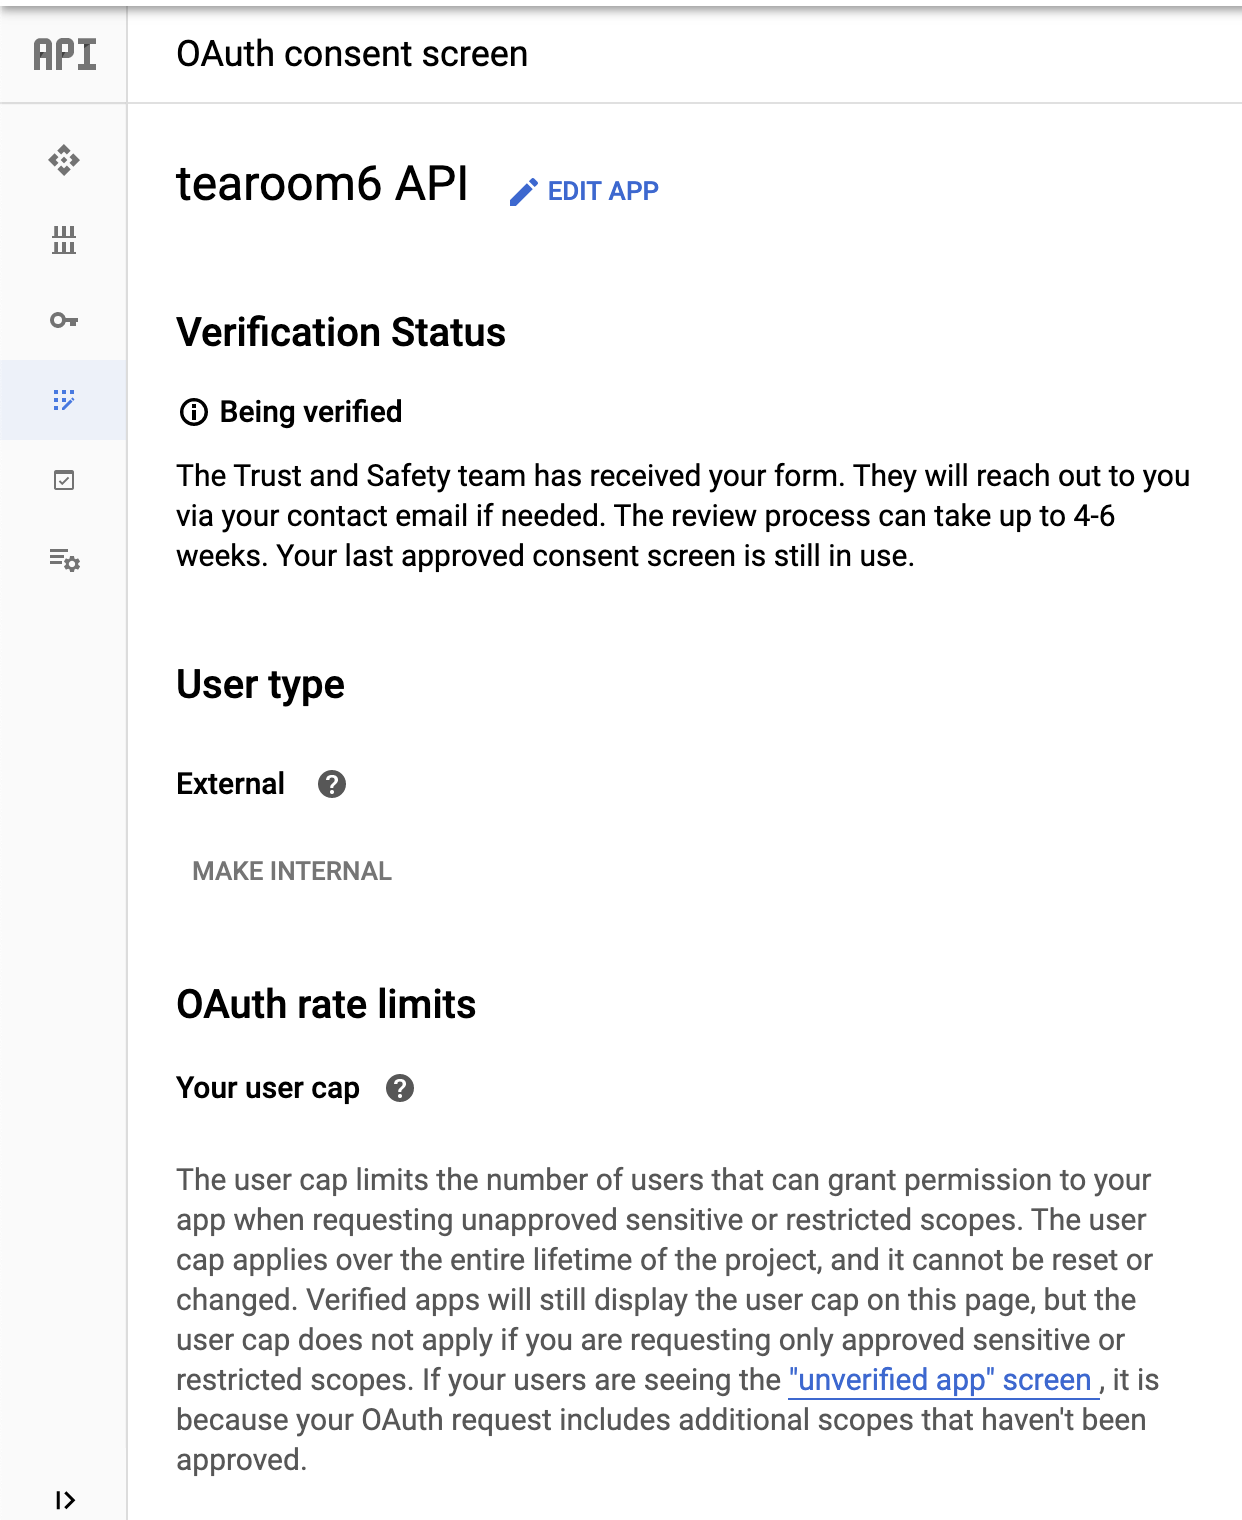
2020年5月現在、 OAuth consent screen のページを開くと、以下のようなメッセージが表示されていました。
Google の審査を受ける以上、おそらく "Application Homepage link" や "Application Privacy Policy link" は設定しておいた方がいいでしょう。かなり面倒だなとは思いましたが、やはり避けては通れないらしい。 GitHub Pages にカスタムドメインの設定を行うことで、用意しました。悪意ある拡張機能を弾くためには必要な措置なんでしょうけど、僕みたいに善意で公開している人間にとっては、これはちょっとした負担ですよね。 ("Application Terms of Service link" は Optional となっているので、必須ではなさそう)
GitHub Pages にカスタムドメインの設定を行うには、 GitHub Pages を公開した上で、
- GitHub Pages の設定で、 Custom domain をセット (サブドメインもセット可能)
- DNS の設定で、設定した Custom domain に対する CNAME を追加 (value は
xxx.github.ioをセット)
なお、 GitHub 側では HTTPS 証明書の作成が行われ、 DNS 側でも設定反映に少し時間がかかりますので、設定後、反映までは少々待つ必要があります。
DNS が正しく設定できているかは、こんな感じで確認してください。
$ dig quickdrive.tearoom6.biz +nostats +nocomments +nocmd

; <<>> DiG 9.10.6 <<>> quickdrive.tearoom6.biz +nostats +nocomments +nocmd
;; global options: +cmd
;quickdrive.tearoom6.biz.       IN      A
quickdrive.tearoom6.biz. 300    IN      CNAME   tearoom6.github.io.
tearoom6.github.io.     3600    IN      A       185.199.111.153
tearoom6.github.io.     3600    IN      A       185.199.110.153
tearoom6.github.io.     3600    IN      A       185.199.109.153
tearoom6.github.io.     3600    IN      A       185.199.108.153
次に、カスタムドメインの verification を行います。カスタムドメインを上述の "Application Homepage link" として設定するためには、そのドメインを Google の "Authorized domains" に登録する必要があるからです。
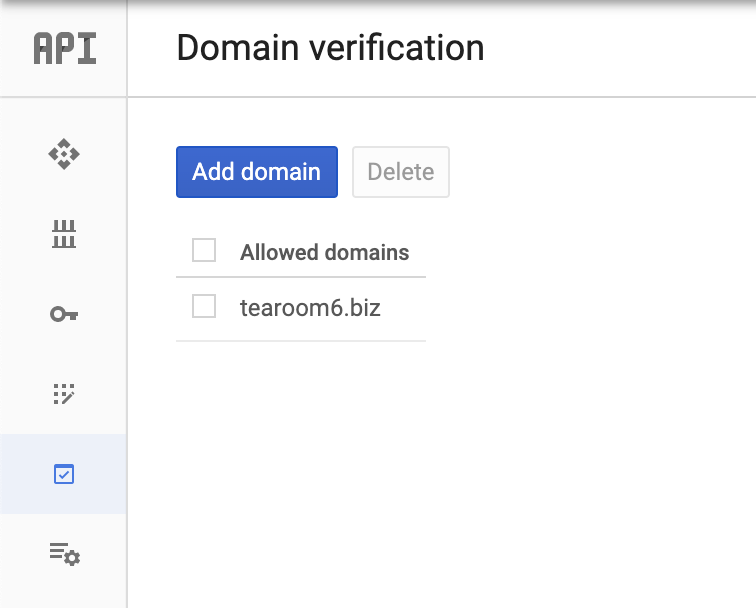
Google APIs Domain verification のページを開き、 "Add domain" を実行します。 すると Google Search Console のページに遷移します。
その画面で、 Domain name provider (今回の場合は Onamae.com) を選ぶことで verification record が取得できるので、 DNS の設定 (今回の場合は Route 53 で設定している) でその値をセットしたカスタムドメインの TXT レコードを作成します。
その上で verify を実行すると、 Google APIs Domain verification のページで、以下のように登録済みのドメインとして表示されます。 (非常に質素な画面だけど...)
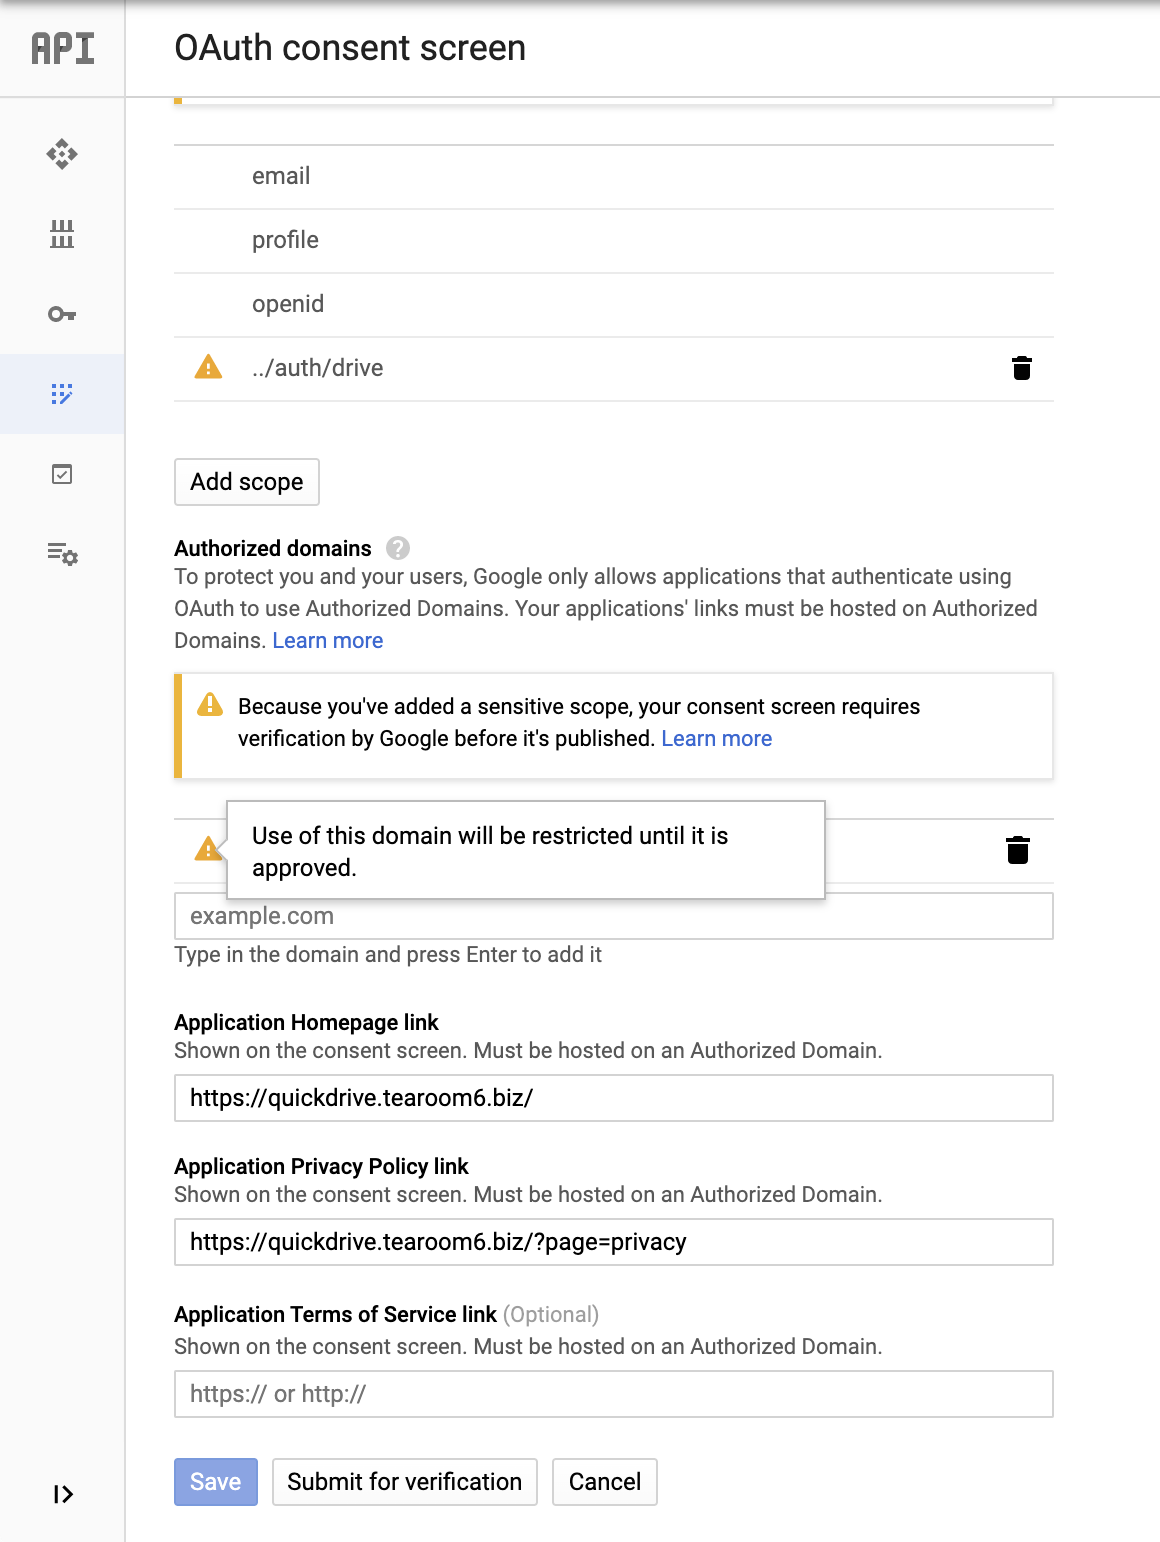
この状態で、再び Google APIs OAuth consent screen の編集ページに移動します。同意画面に表示される内容に問題がないか、改めて確認します。
そして、ページ最下部の "Submit for verification" を押します。カスタムドメインのところに "Use of this domain will be restricted until it is approved." みたいな警告が出たままですが、気にしません。
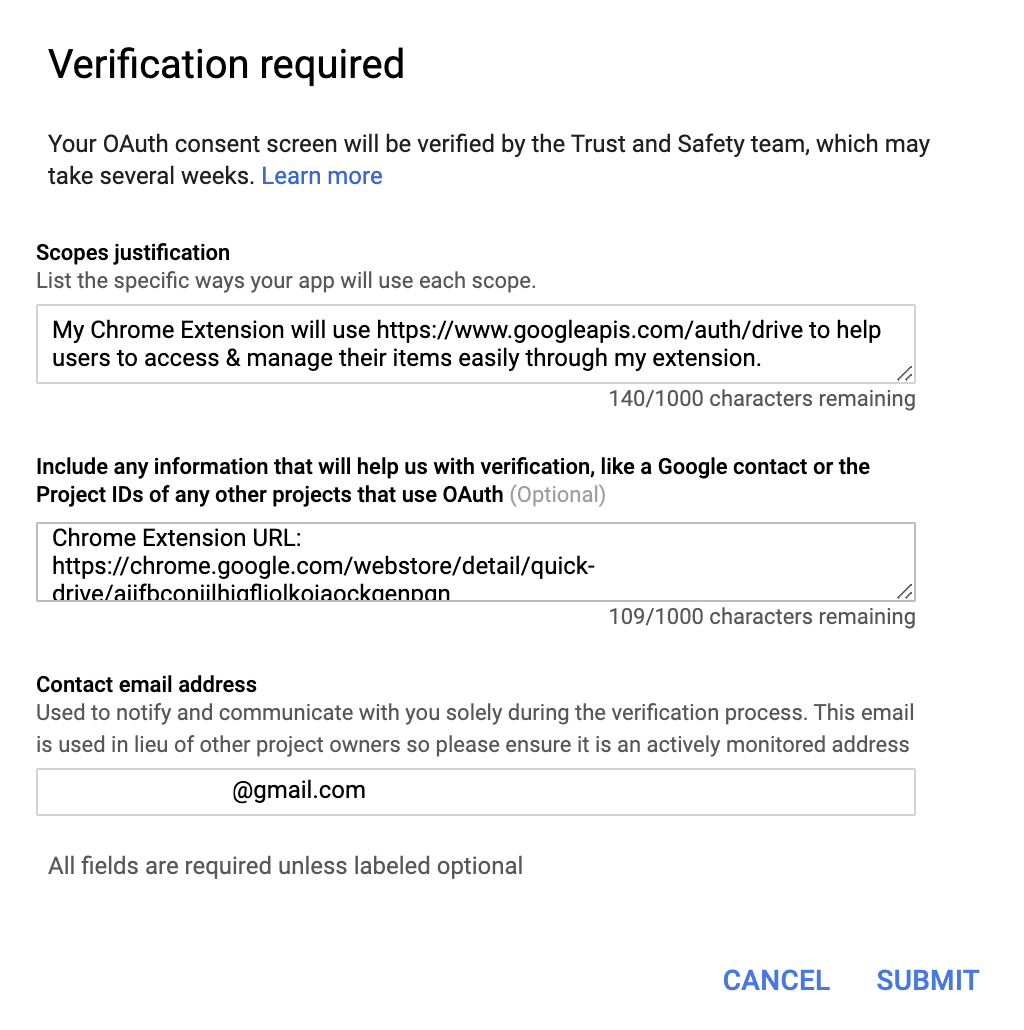
入力フォームが出現するので、必要事項を入力して submit します。
- Scopes justification:
My Chrome Extension will use https://www.googleapis.com/auth/drive to help users to access & manage their items easily through my extension. - Include any information that will help us with verification, like a Google contact or the Project IDs of any other projects that use OAuth:
Chrome Extension URL: https://chrome.google.com/webstore/detail/quick-drive/aijfbconiilhjgfljolkoiaockgenpgn - Contact email address:
xxx@gmail.com
"Being verified" status に変わります。審査に 4-6 週間かかるそうです。
ともあれ、手順的にはこれであっているはず。審査が終わるのを待ちましょう。
その後の経過 (追記)
僕の場合、4-6 週間どころか、2-3 日のうちに Google からメールが届きました。 (もちろん英語) おそらくコロナの問題もあるし、ワーストケースの想定だったんでしょうね。
いろいろ注意事項が書かれていましたが、メインの依頼は OAuth の consent screen を許可する様子を映した動画を撮影し、公開できるところに置いて、このメールに返信してくれ、とのこと。 ただ、 OAuth の verification はまだ済んでいないので、このままだと撮影しようにも撮れない。
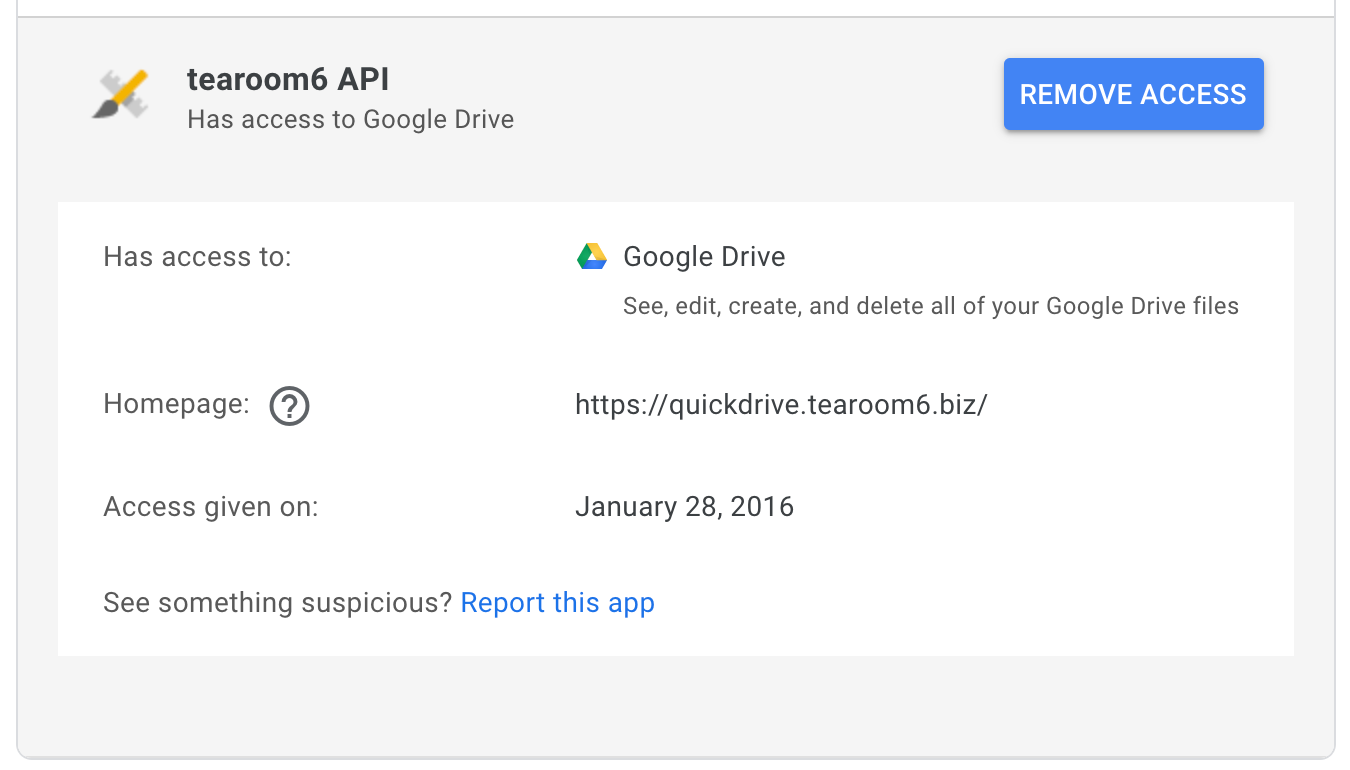
この Google のメールは、直接返信してやり取りしましょう、という方式だったので、返信メールの中で自分の開発者アカウントを指定して、このアカウントに対しては OAuth consent screen が表示される状態にしてほしい旨を連絡。そしたら 1 日以内に対応してくれました。 (test group というのに追加をしてもらえたようです)
ただ、このアカウントは、既に OAuth 許可済みの状態だったので、一度これを解除する必要があります。 Google のサービスに関して OAuth を許可した一覧は https://myaccount.google.com/permissions で取得できるので、ここから "Remove Access" を実行します。
これで晴れて動画を撮影、 YouTube で公開します。
緊張するので、このためにわざわざ原稿まで作りましたよ、、
Then i will explain how to permit the Quick Drive extension to use Google OAuth.
First install the extension from Chrome web store.
Next launch the extension.
Choose the Google account you want.
Then OAuth consent screen appears.
You can see the app name, private policy, and which permission required.
After that, This extension uses OAuth permission to retrieve your stared items, recent items, or search items.
These data will never be sent to our server.
The code is open source, so you can check this.
That's all.
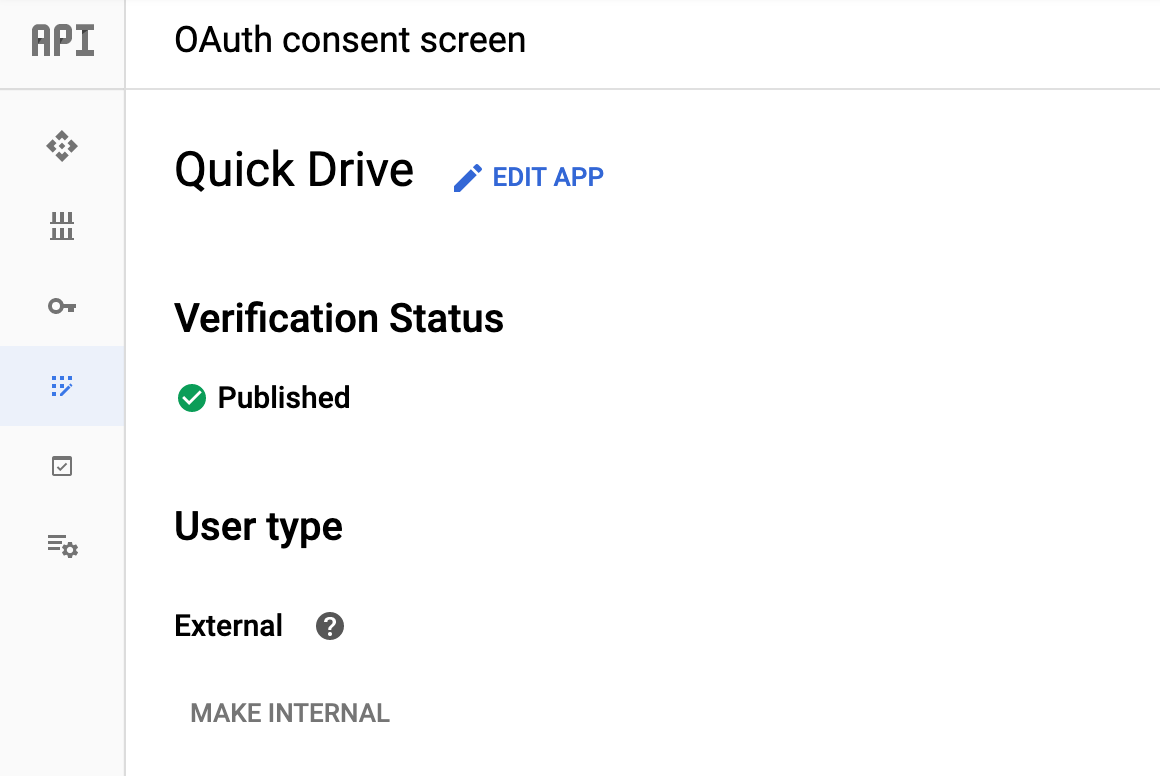
最終的に、承認を頂いて、 "Published" status に変わりました。
この状態で、 OAuth 未承認の状態で Quick Drive extension を起動すると、以前のように、まずアカウント選択画面が出てきて、
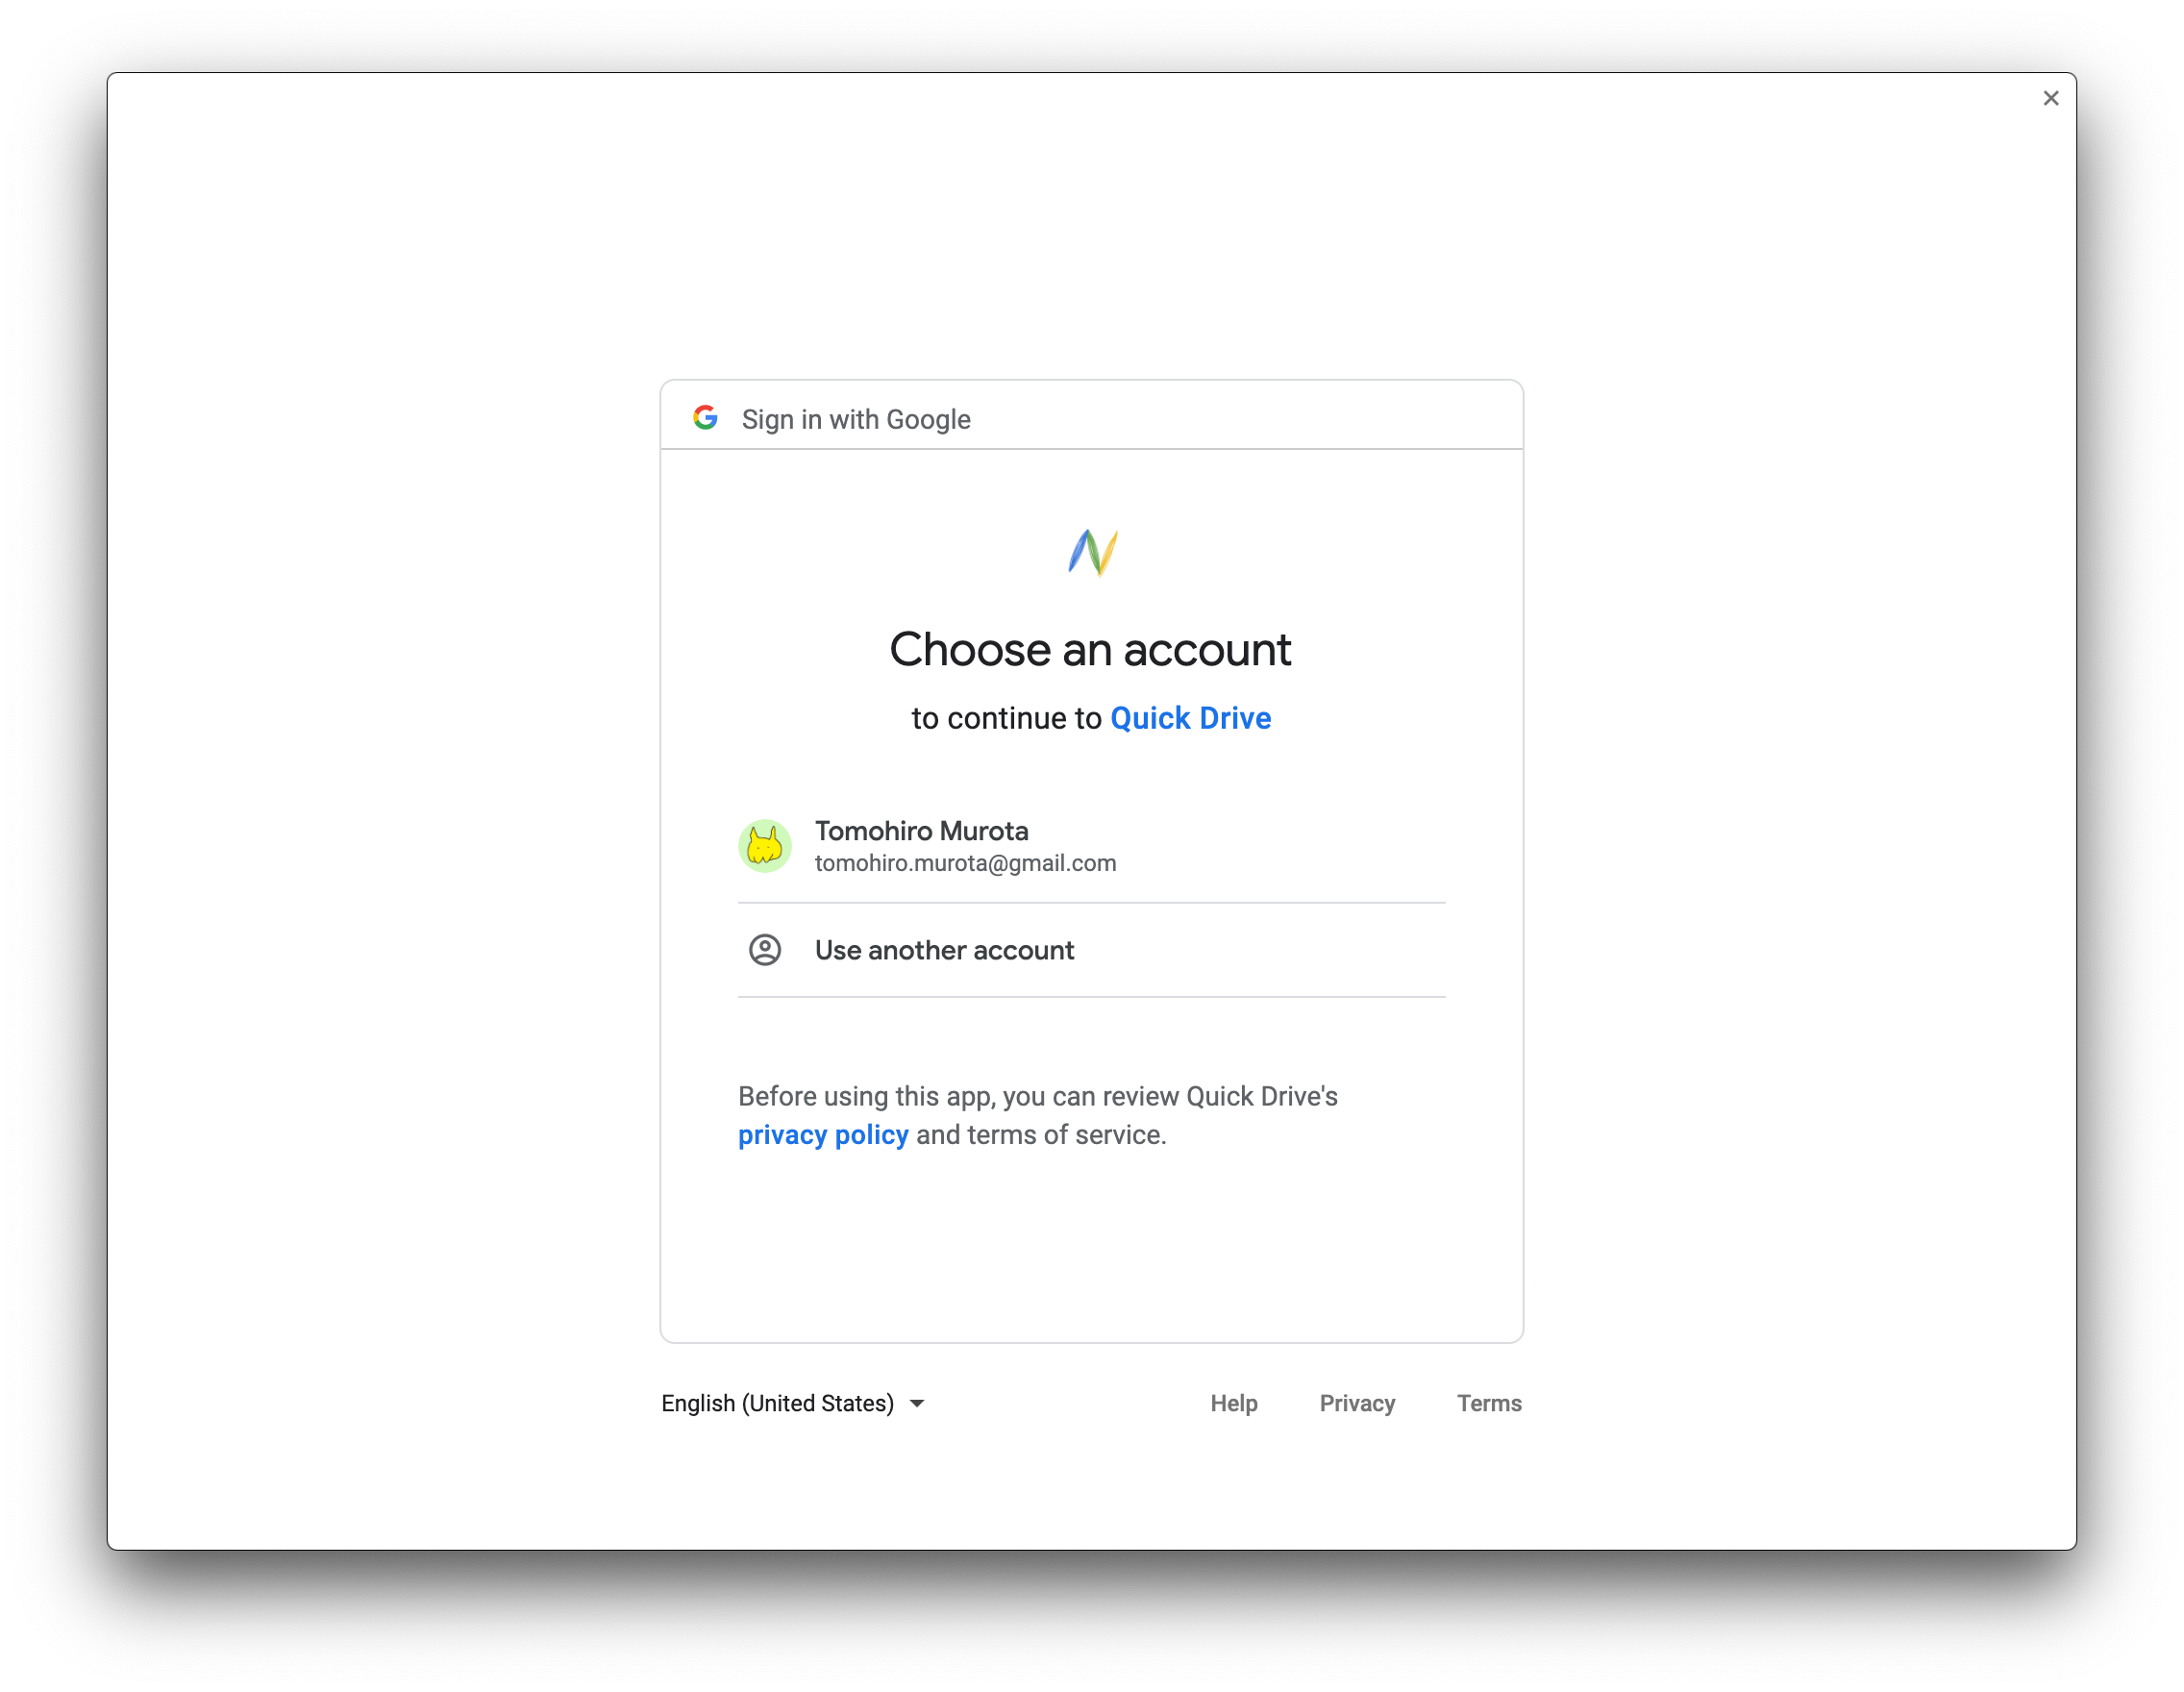
次に同意画面が開きます。
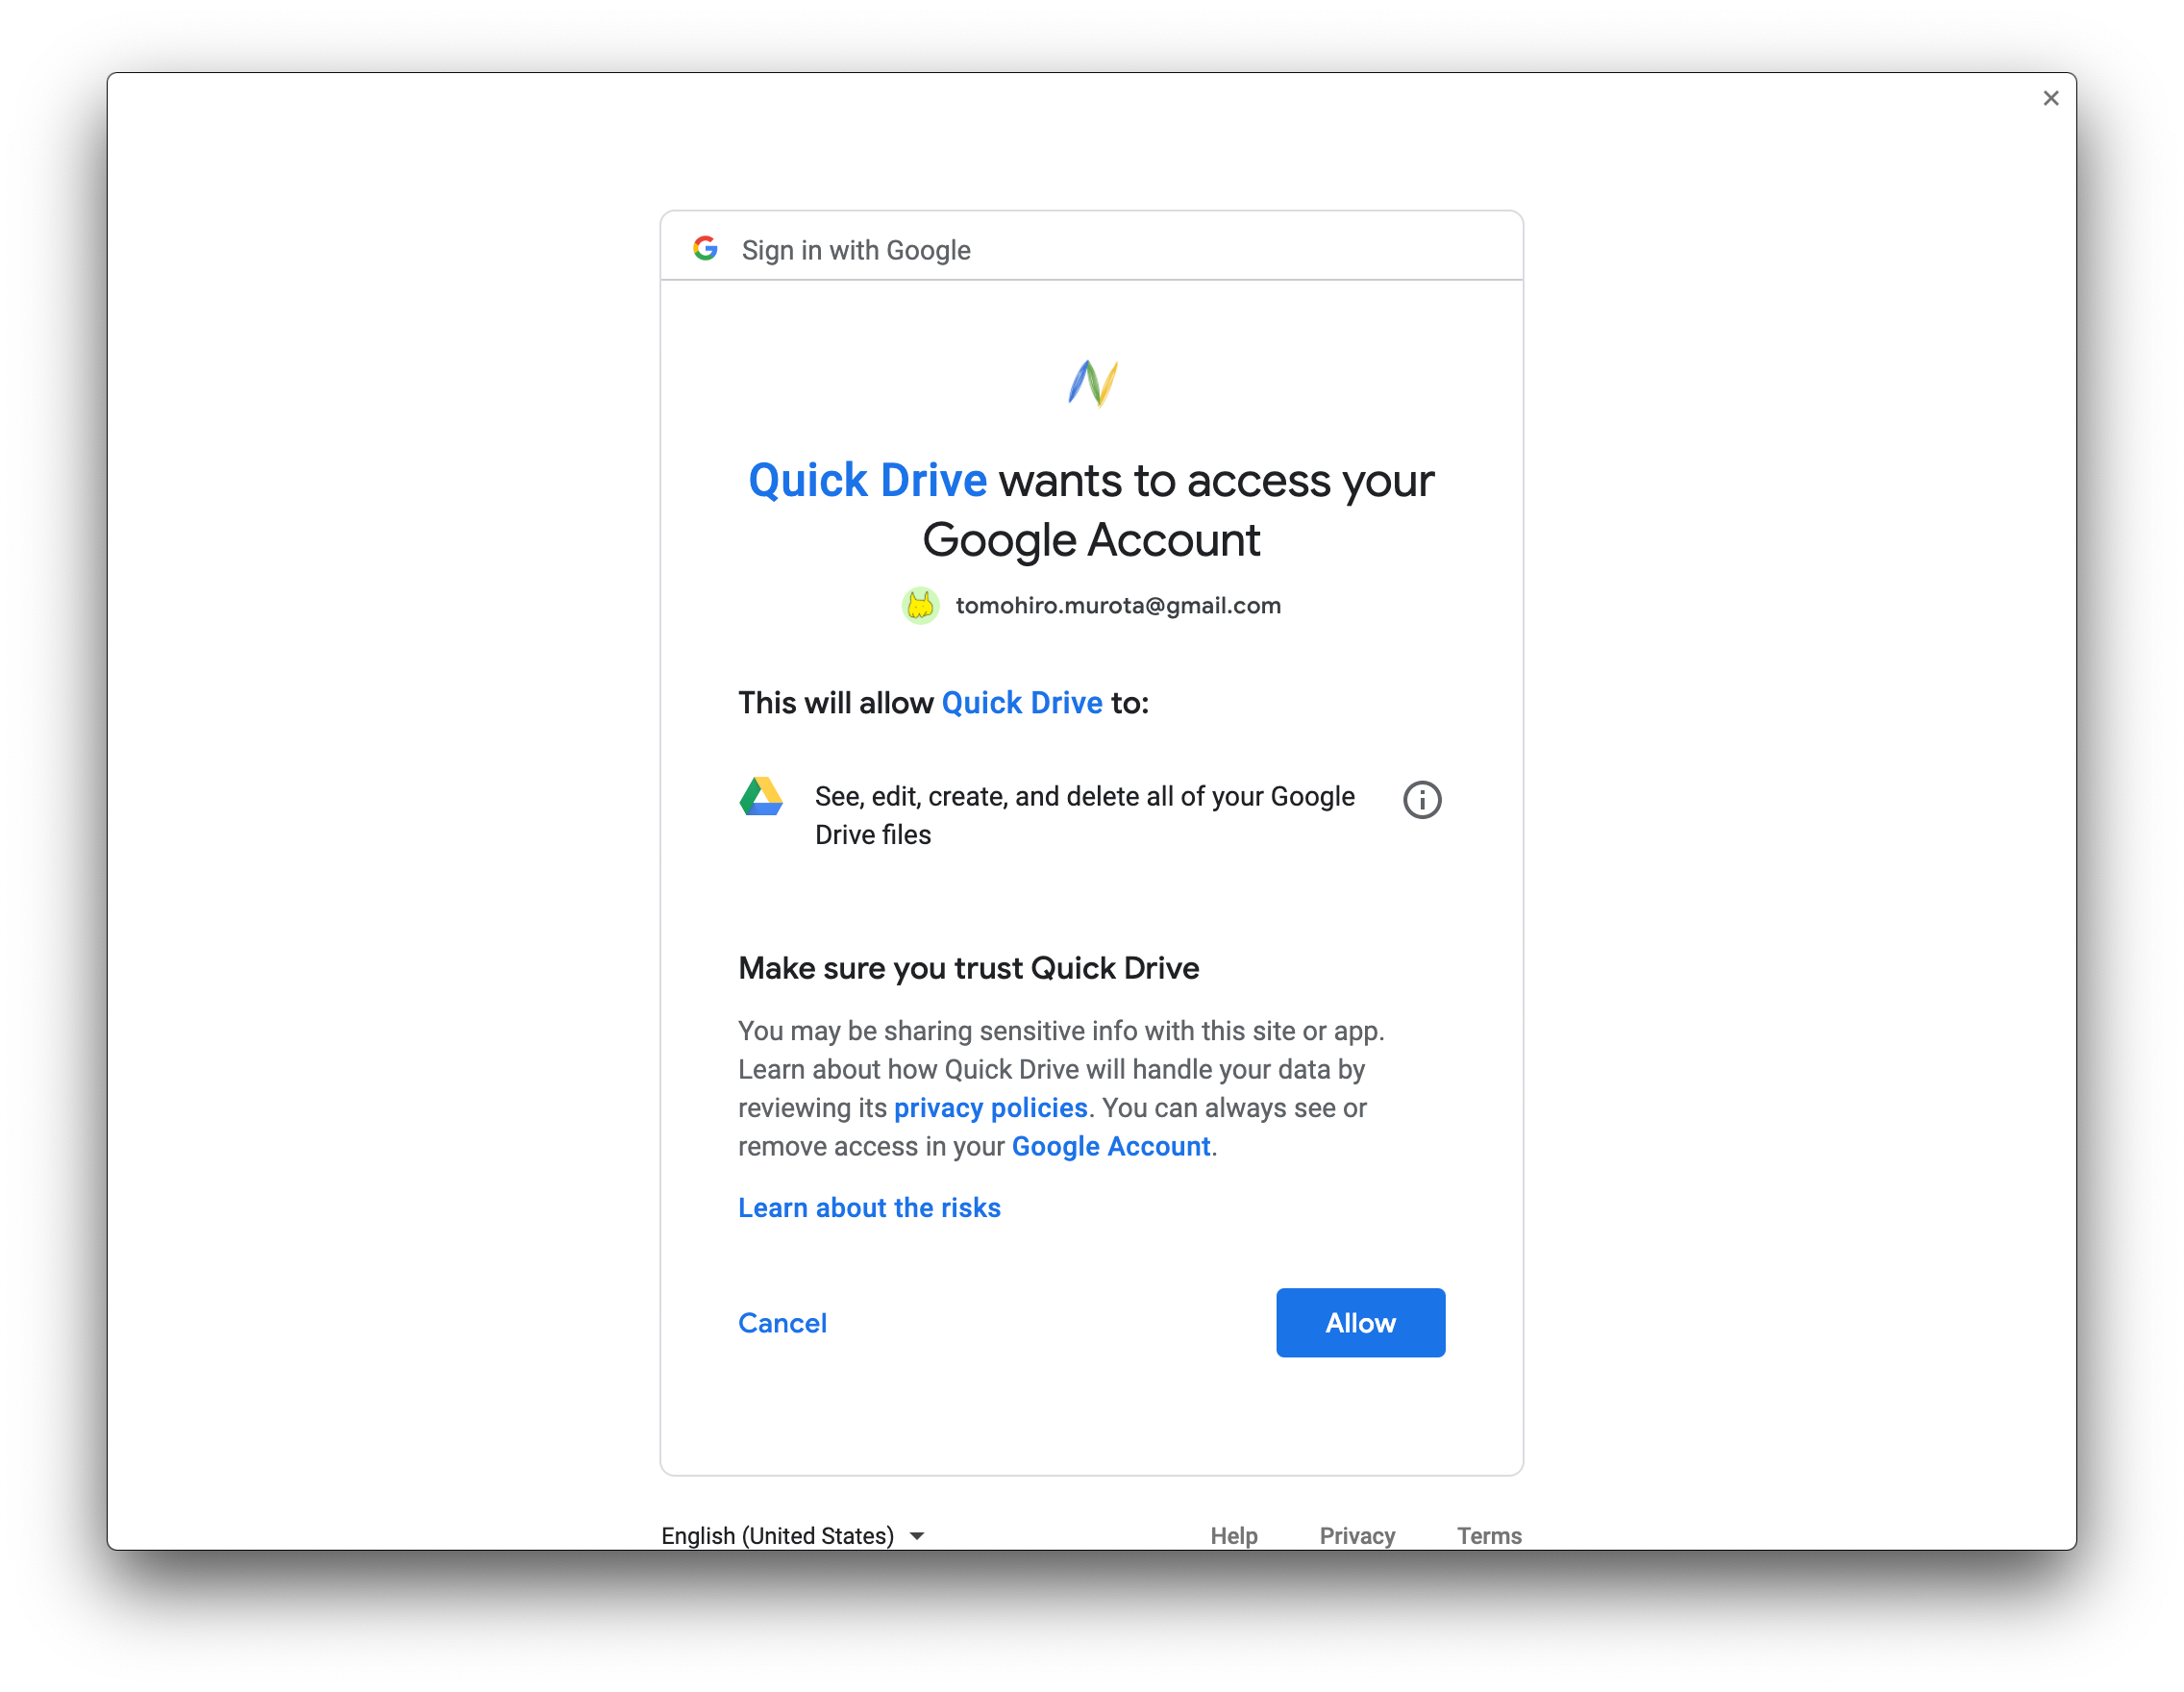
承認すると、元通り使えるようになりました。バンザイ!アリガトウ!
Google のサポートの人の対応は早くて、親切でした。
余談
はじめ、カスタムドメインを Google に verify させる方法を検索していて G Suite にカスタムドメインをセットする際の話ばかり出てきて、そちらに引きづられそうになりました。 G Suite は月額料金がかかっちゃいますし、オープンソースのツールを提供するだけで、、それはできれば避けたい。
なお G Suite 上で "Verify domain ownership" を行う場合も、今回とほぼ同様に TXT レコードを作成するようです。 (他の方法も用意されていますが)
References
- Google APIs - Android - OAuth Credentials Consent - Google Groups
- Setting up OAuth 2.0 - API Console Help
- Setting up OAuth 2.0 - Google Cloud Platform Console Help
- OAuth 2.0 の設定 - Google Cloud Platform Console ヘルプ
- Verify your site ownership - Search Console Help
- OAuth API Verification FAQ - Google Cloud Platform Console Help
- OAuth Client Verification | Apps Script | Google Developers
- Unverified apps - Google Cloud Platform Console Help
- Do All Google Oauth 2.0 Client need verification? - Stack Overflow
- Configuring a custom domain for your GitHub Pages site - GitHub Help
- hawksnowlog: Google の OAuth で「このアプリは確認されていません」を表示されないようにするまでの道のり
- GitHub Pagesを独自ドメインで公開する - A1 Blog
- chrome.identity を使ってChrome拡張でもOAuthのAPIを使う - Qiita
- oauth 2.0 - Is it possible to get an Id token with Chrome App Indentity Api? - Stack Overflow
- chrome.identity - Google Chrome
以下は、今回の記事とは直接関係なかった。